Can You Stick Weld Thin Metal? Equipment And Techniques
If you are new to stick welding (SMAW), chances are that you tried to weld thin metal, but you ended up burning through or warping it. You probably wonder if it is possible to do it.
You can stick weld thin metal, for instance, less than 1/8″ (3.2 mm) with satisfactory results if you use the proper welding equipment, settings, and technique. The more knowledge and experience you have, the thinner metals you can stick weld.

Stick welding gives good results from 1/8″ thick metal and up, but it is not the ideal process for thinner workpieces.
After reading this article, you will learn everything you need to get better results. Plus, two alternative ways to join thin metal with your stick welder.
Table of Contents
- Why is it hard to stick weld thin metal?
- What are the problems when welding thin metal?
- What is the thinnest metal you can stick weld?
- What kind of power supply do you need?
- Which polarity is the best for thin metal?
- What welding rod to use for thin or sheet metal?
- How to prepare thin metal for stick welding?
- Do you need a chill bar?
- Which welding position is best?
- What techniques are used for stick welding thin metal?
- What alternatives do you have?
- Final thoughts
- Can you stick weld thin stainless steel?
Why is it hard to stick weld thin metal?
Stick welding thin metal is hard because this process produces a strong arc that inputs a lot of heat in the joint. Furthermore, when stick welding, you always pull the rod, which results in a hotter puddle. Moreover, most stick welders cannot output very low amperage, so that you can work with thin metals.
Excessive heat helps to weld thick workpieces with deep root penetration and overall joint fusion, but makes welding thinner ones very difficult.
What are the problems when welding thin metal?
It all comes down to the fact that too much heat goes into the thin workpiece, creating numerous problems:
1. High risk to burn through the metal
The worse thing that can happen is to burn through the metal, creating a hole. High amperage, slow travel speed, and pausing when you pass the bead will result in a high heat concentration over the puddle.
The thin edges cannot handle the heat and melt away. The puddle itself becomes too big and bulky and, at some point, drops through the hole.
2. Metal distortion or warping of the metal
Distortion is the permanent bending that happens to the workpiece from uneven and rapid warming and cooling.
Thin metals are very sensitive to distortion because they cannot dissipate heat fast enough. They also don’t have the strength to resist the irregular contraction and shrinkage forces.
You can prevent distortion by controlling the heat that goes in the joint, frequent tacking, using appropriate direction techniques, etc. These are described later in the article.
It is not that hard to avoid blowing holes in thin metal, but it is exceptionally hard to avoid distortion.
3. Defects of the Heat Affected Zone (HAZ)
The HAZ is the area around the bead that hasn’t melted, but has been metallurgically affected by the heat.
The amount and the rate that heat goes in the metal determines the size and the defects the HAZ may have. You can minimize, but you cannot avoid the HAZ when welding any thickness.
In case you work with steel stronger than mild steel, the HAZ can get hard enough, when it cools down, that it’s possible to crack.
4. High amount of deposited metal in the joint
With stick welding, the electrode and the filler metal are the same. You don’t have direct control over the filler metal as with TIG welding. It melts continuously at a steady rate.
This tends to deposit a lot of filler metal in the joint. The welded joint will look ugly and may cause bad fitting, depending on the project.
If you try to remove the excess metal with an angle grinder, you risk removing too much metal, making the joint weak. The workpiece may also warp from the excessive heat the angle grinder will create.
What is the thinnest metal you can stick weld?
With some experience, you can stick weld 3/32″ (2.4 mm) mild steel with acceptable results. A welder with a lot of knowledge about heat control can stick weld down to 1/16″ (1.6 mm) thin metal or even less.
The previous numbers are possible, but they require a lot of knowledge, focus, and practice. But if you chose your equipment carefully and spent a lot of time perfecting the proper techniques, you can do it.
The results will be acceptable within reason, since stick welding is not suitable to join thin metals.
Now let’s see what equipment you need and how to stick weld thin metals.
What kind of power supply do you need?
A direct current (DC) inverter is the best power supply to stick weld thin metal. DC creates an arc with smoother characteristics and is very helpful for thin workpieces.
Alternating current (AC) needs a slightly higher amperage for the same rod diameter, and the arc is not as stable as with DC.
Also, most rods work with DC rather than AC, so there are more choices for you to choose from.
Inverter welders can give you the low amperage, for example, 20-40A that you need to weld very thin metals.
Modern inverters come with features such as the hot-start and the arc-force that let you control the arc’s behavior to achieve better results.
Finally, new stick machines offer pulsed welding. Here the current pulses between a high amperage for penetration and a lower one to prevent too much heat in the joint.
Which polarity is the best for thin metal?
If you have a DC welder, use Direct Current Electrode Negative (DCEN or DC-) for thin metals. You plug the electrode holder (or stinger) into the DC- connector and the working clamp into the DC+ one. Some welders may have a switch to choose the polarity.
DCEN melts the rod faster. You can pass it faster over the joint and input less heat. This will prevent blowing through the metal and high distortion.
What welding rod to use for thin or sheet metal?
The E6013 welding rod is the best to stick weld thin mild steel and is known as a sheet metal rod. An E6013 has a flux covering with high amounts of rutile. Rutile creates the smoothest arc with light penetration that won’t burn through the joint as easily as other rods.
An E6013 is very easy to use. You can ignite, but also stop and restart the arc with ease. This allows welding techniques that input less heat into the workpiece.
If you have a DC welder, you can use DCEN with an E6013. As mentioned earlier, this polarity inputs less heat.
Furthermore, you can find an E6013 with the thinnest diameter of 1/16″ (1.6 mm). This rod diameter has a low amperage range, around 20-40A.
With a thin 1/16″ E6013 and a low amperage, you have a small puddle suitable for thin metals.
Other rutile rods such as the E6012 or the E7014 are also suitable for thin metal. But not as suitable as an E6013, and they are not easy to find, especially in thin diameters.
Beyond rutile rods, many welders use cellulosic rods such as the E6011. These rods create the hottest and strongest arc, and they are harder to weld with. But you can weld relatively thin metals with the proper technique and a lot of practice.
Cellulosic rods are actually good for welding thin metals in the vertical and overhead positions because they solidify very fast.
How to prepare thin metal for stick welding?
To stick weld thin metal, the joint must have a tight and symmetrical fit-up. Also, clean metal is essential for easier puddle flow. Finally, frequent tacking along the joint and preheating will help to prevent distortion.
1. Ensure you have a good fit-up
Thin metals cannot absorb much heat and are very easy to melt if you do not have a joint with a good fit-up.
If there are uneven gaps in the joint, or the edges do not have the same thickness, the heat will concentrate on the weak parts and melt them.
Thin workpieces do not need a wide root opening for full penetration. A small root opening will offer strong welds. At the same time, it will absorb residual stresses from shrinkage.
If you try to weld thin sheet metal, it would be better to create edge or lap joints. They can tolerate the heat better than ordinary butt joints.
Finally, during fit-up, you can position the metals in a way to anticipate the expected warping. This way, the metals will come back in the position you want them as they cool down.
2. Clean the workpiece
Clean the joint and the spot where you will place the working (ground) clamp. This will offer better arc stability and puddle wetness.
If there is mill scale, rust, paint, or other impurities, on the joint they will act as electrical insulation. Furthermore, remove slag material from tacking or previous welding.
If the joint isn’t clean, the arc doesn’t start easily and isn’t as stable. Also, the molten puddle cannot flow properly and stays restricted. This will give you a narrower but taller bead that you have to grind later.
A clean joint will help to avoid slag inclusions that are common if you are going to use rutile rods or start and stop the arc often.
3. Tack weld often
It would help if you make frequent low-profile tack welds along the joint, for example, every 2″ (50 mm) or less, after clamping the workpiece.
If the tacks are convex, grind them carefully to make them flat. Clamping and tacking before you weld will help a lot to prevent distortion.
4. Preheat the workpiece
I left preheating for last, but actually, this is the best thing you can do to avoid distortion before you start welding.
With preheating, you minimize the arc’s concentrated and fast heat input into a cold workpiece. Furthermore, an evenly heated workpiece will cool down symmetrically and slowly, which will prevent wrapping.
But preheating a small workpiece is hard to do because you need to do it in a perfectly even way, for example, by putting it into an oven.
You can use processes such as oxyacetylene to preheat the workpiece, but it requires a lot of experience. If you preheat the workpiece unevenly, it will wrap even if you don’t weld it.
Do you need a chill bar?
It would help a lot if you can use a chill bar to stick weld thin metals because they can absorb heat at high-speed rates. Get one made of aluminum or, even better, copper. A cheaper solution would be to use a steel bar. Steel is not as good as the previous metals, but it is better than nothing.
Pick a chill bar (or backing bar) that is at least 1/8″ (3.2 mm) thick. The thicker, the better. Clamp your workpiece firmly on the chill bar. If you have a joint with a good fit-up, there is no danger of affecting the bar.
It would be even better to place additional bars on the workpiece and clamp them like a sandwich, leaving only the joint exposed.
Chill bars will absorb a big part of the heat and decrease warping or burning through significantly.
Which welding position is best?
Try to weld thin metal in the flat position if you can. Flat is the easiest one and gives better control and comfort. If you must weld in the vertical position, do it by pulling the rod downwards.
The vertical-down position is better for thin metal because you can weld faster. This will input less heat into the joint.
If you weld vertical-up, it is very easy to burn through the workpiece. Especially when you reach the joint’s end.
What techniques are used for stick welding thin metal?
The way you create the bead is essential. This is the most difficult part, where you must do your best and make the previous steps productive.
It’s very common to overweld joints because most people think this will make them stronger. Welding is by nature very strong. Thin workpieces don’t need a lot of welding to hold them together without problems.
You must weld with a small puddle that deposits a small volume of filler metal and heat. Excessive deposited metal doesn’t add useful strength, and it will cause a lot of distortion.
The technique you use to weld thin metal must input the least amount of heat possible.
1. Pass a small straight bead
If the joint is short, for instance, 1″ (25 mm), you can run a straight bead (or stringer). The speed you use to weld is the most important parameter you must focus on.
Try to do pass the bead with a steady speed without pausing. Also, travel as fast as possible but without creating any defects from it. If you have a well-formed bead with enough penetration, you are fine.
When welding thin metal, it isn’t recommended to weave the rod. It reduces the speed and inputs excessive weld metal and heat.
2. Use stitch welding
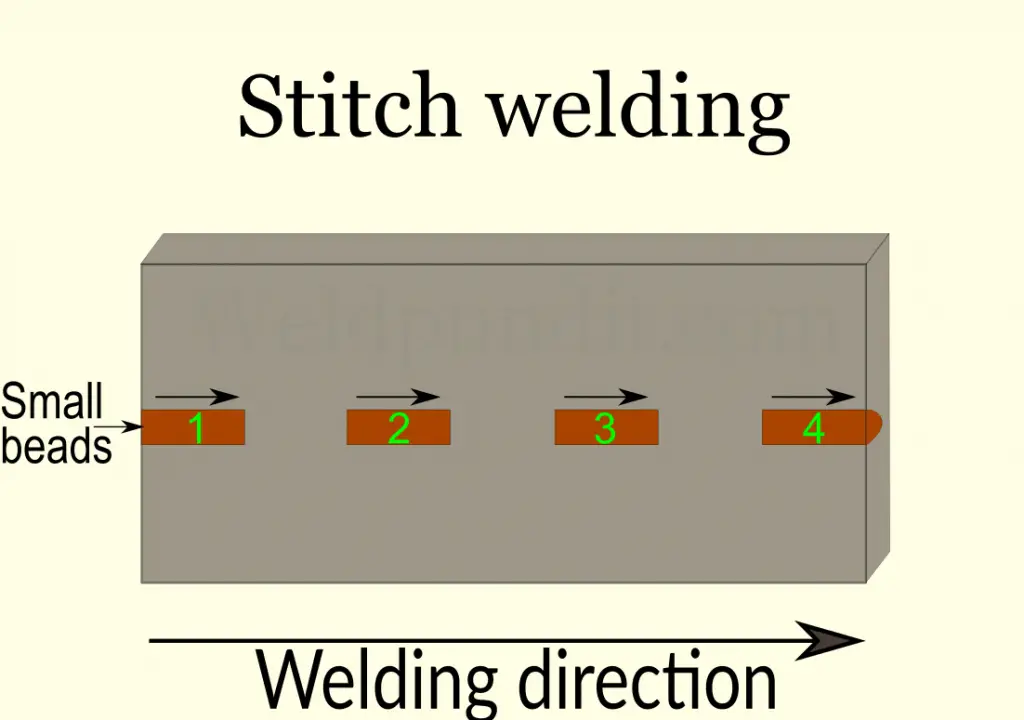
If the joint is long, you can’t run a continuous bead because you will overheat the joint. It would be better to use techniques such as stitch welding. We also call it skip, or more officially, intermittent welding.
With stitch welding, you weld a short bead, for instance, 1/2″ (12.7 mm). Then you leave an equal gap and repeat until you finish the joint. The gap you leave can be longer, if you want.

The main benefit of stitch welding is that you put far less heat into the workpiece.
You can leave the joint like this, which is fine. For most thin metal projects, joints with gaps are strong enough. This way, you save time and a few rods since you don’t weld the entire joint.
But if you want the joint to look better or avoid dirt in the gaps, you can weld them when the workpiece cools down. You can wait around 15 -30 minutes or blow compressed air on the joint to cool it faster.
3. Try backstep welding
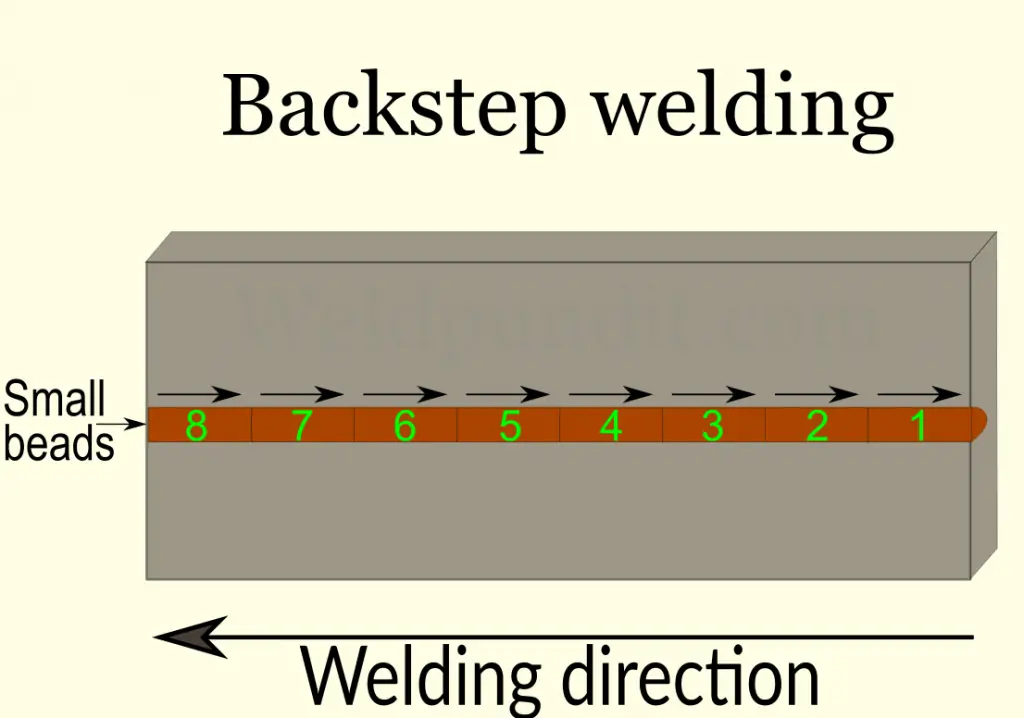
With the backstepping technique, you weld small beads that have a direction opposite to the main welding direction.
For example, if the main welding direction goes from right to left, you weld each bead from left to right. You start from the right edge of the joint.

When you weld, the direction that the heat travels and concentrates is the same as the direction you weld. In the previous example, it concentrates on the left part of the workpiece.
If the small beads have the opposite direction, the heat they produce travels opposite to the main welding direction. This distributes the heat on the workpiece symmetrically. The result will be less distortion.
You can weld each bead next to the previous one. But, if you want to lower the heat input even more, you can weld every second or third segment like skip welding.
4. Symmetrical welding
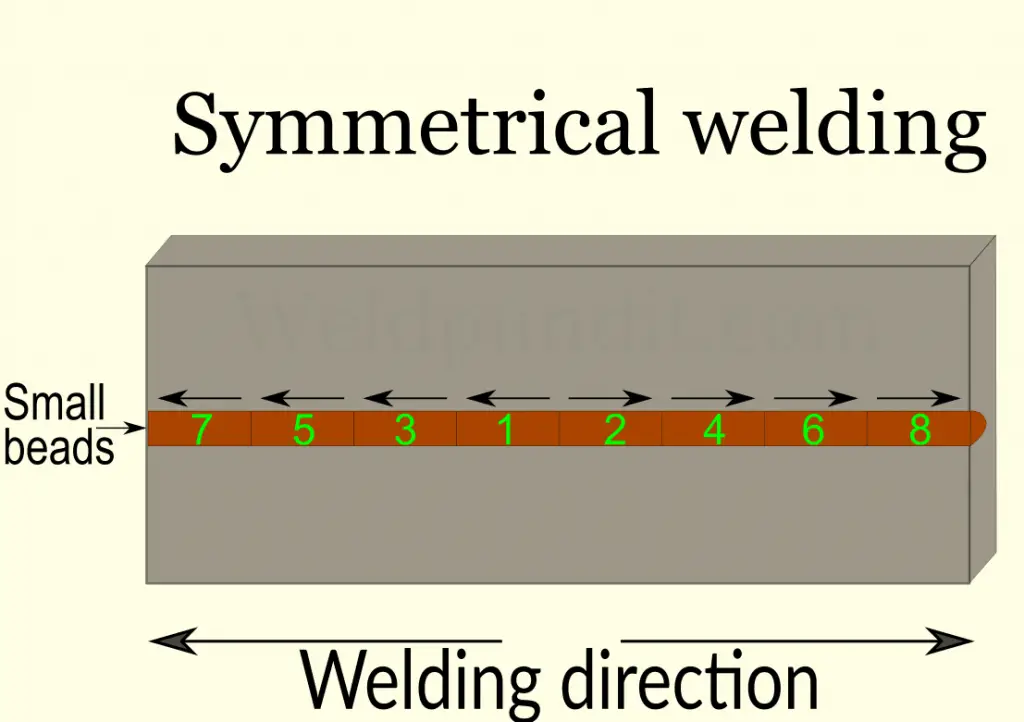
With symmetrical welding, you start at the center of the joint. You weld a segment on the left, then one on the right. Then you weld on the left of the first bead, then on the right of the second bead. Repeat until you finish the joint.
The image below describes it better.

The center of the workpiece often warps from excessive heat. Symmetrical welding takes longer to complete, but does the best job to avoid this problem.
5. Fill the joint with tacks
Another welding technique for thin metals is filling the joint with tack welds. Tacking is the most practical and simple way to avoid burn through and warping. However, it creates an ugly joint and takes time to fill long joints.
Repetitive tacking is a great way to avoid excessive heat in the joint because it cools down between each tack weld.
One way to do it is to make a series of continuous overlapping tacks, one next to the other. This way, you mimic the pulse function that expensive welding machines offer.
Another way is after you finish the first tacks to hold the joint, you tack in the joint’s center. After that, you tack again at the center of each half until you fill the joint with tack welds.
One thing to keep in mind is that you don’t need to fill the entire joint with tacks. If it’s sheet metal or the entire workpiece is small, it will hold even if you leave gaps.
A problem with this technique is restarting the arc many times. This can cause defects, most often slag inclusions and lack of fusion.
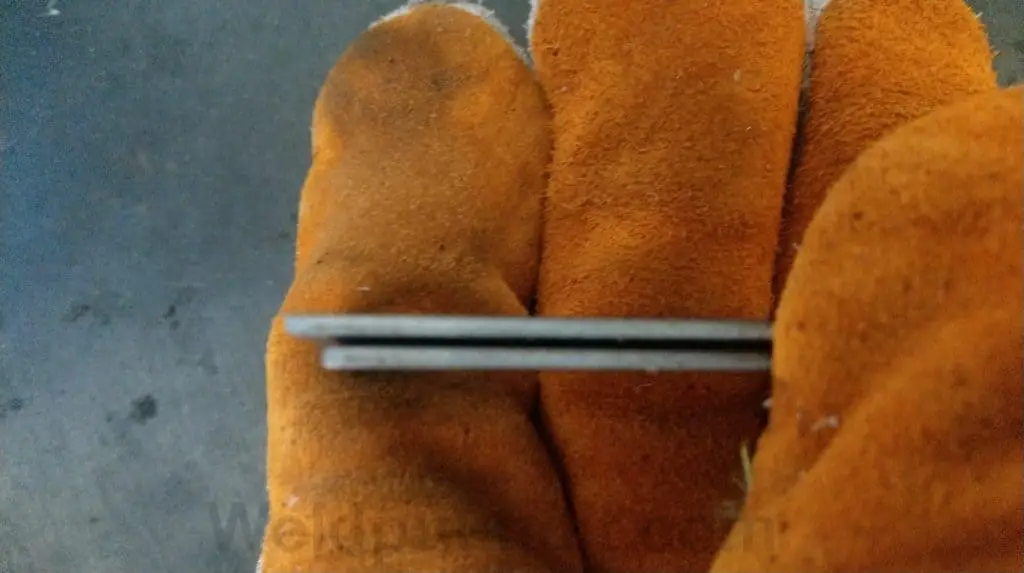
When the rod is new, it is long and hard to keep it steady. Holding the rod with dry welding gloves helps to reduce shacking and tack easier. It works well for a few tacks before the rod gets hot. But at this point, the rod is shorter and easier to handle.
The previous techniques require frequent arc restarts. This increases the risks of defects, but also places higher stress on the power supply and drops its duty cycle. Another frequent problem is sticking the rod on the workpiece.
What alternatives do you have?
Now, let’s see two alternative ways to join thin metals with a typical stick welder.
1. Use braze welding electrodes
You can join thin metals with your stick welder by using braze-welding rods instead of typical rods. Braze rods are excellent at lowering the danger of damaging thin metals. They are easier to use and work faster.
Braze welding rods are based on copper. They melt at a lower temperature than steel rods. When you braze, there is no molten puddle, only the rod melts. The molten rod sticks to the base metal’s surface without penetrating it.
That is a huge advantage for thin metals, greatly reducing the burning through and warping risk.
The most common braze stick rods are silicon bronze (ECuSi or SiB), phosphorous bronze (ECuSn), and aluminum bronze (ECuAl).
The ECuSi and the ECuSn have a lower tensile strength (50ksi) than mild steel (60+ksi). The ECuAl has a tensile strength of 70ksi like an E7014 rod.
The main disadvantages of braze welding are:
- The brazed joint is weaker than a welded one. But it’s not necessary for most thin metal projects. You can create a larger bead for added strength if you think it’s necessary.
- Copper-based braze metal loses strength under high temperatures. That’s around 930 °F (500 °C). However, it holds perfectly up to 400 °F (200 °C).
- You need to perfectly clean the joint so the brazing metal can flow freely and make a strong bond with the workpiece.
- Brazing rods are more expensive than steel rods, but they will save a thin workpiece from damage.
- Finally, there is no color match since the bead will have a goldish color.
2. Update your stick welder to a basic TIG welder
There is another solution to weld thin metal with a stick machine if you have experience with TIG welding (or want to learn it).
You can attach to your stick welder a TIG torch that has a dedicated gas controller. Then connect it to an argon gas cylinder with the proper gas regulator. Now you have a very basic TIG welder without having to buy another power supply.
You will not have a real TIG welder, but after some practice with scratch starting the arc, you can weld thin steel with far better results. You can even weld 24 gauge (0.5 mm) sheet metal.
Furthermore, if your stick welder has a lift-start ignition, you can use it for easier arc start and grinding the tungsten electrode less often. Instead of scratching the electrode, you touch the surface and lift it at welding distance as the arc starts.
Keep in mind that you need a DC stick welder to do this, and always connect the TIG torch to the DC- connector.
Final thoughts
With enough preparation and experience, you can stick weld thin metals. But it is hard to have good-looking joints or to prevent distortion perfectly.
Furthermore, it is not productive if there are long joints to weld. You need to use a more suitable welding process.
MIG welding is ideal for long sheet metal. It is also good if you don’t have a lot of welding experience and want to work with thin metals right away. One that supports pulse welding will be ideal.
If you want beautiful joints or to work with expensive thin metals, like stainless steel, you should do it with TIG welding.
Finally, using braze welding rods dramatically lowers the burning thought and distortion risks.
Related questions
Can you stick weld thin stainless steel?
Stick welding thin stainless steel is very hard to accomplice. Stainless steel cannot disperse the welding heat at fast rates and suffers from overheating. Excessive distortion, burning thoughts, and a severe drop in corrosion resistance are the main defects. Better alternatives are MIG or TIG welding or using brazing stick welding rods.
Trying to stick weld stainless steel thinner than 1/8″ (3.2 mm) is challenging and stressful. It needs great experience and concentration. In addition, if you want a good-looking joint, you need to do a lot of grinding and polishing.
Perhaps the easier alternative is to use braze-welding rods. Also, chill bars work wonders because it’s best to keep stainless steel as cold as possible.
If you want to weld thin austenitic stainless steel, for example, 304 or 316, you never use preheating.
